
about ddr |
forums |
buy ddr |
radio |
song lists |
FAQs |
machine locations |
radio |
song lists |
FAQs |
machine locations |
|
|
| Inside a DDR Stage: The Naked Truth Revealed! by Ho-Man, 20 December 04 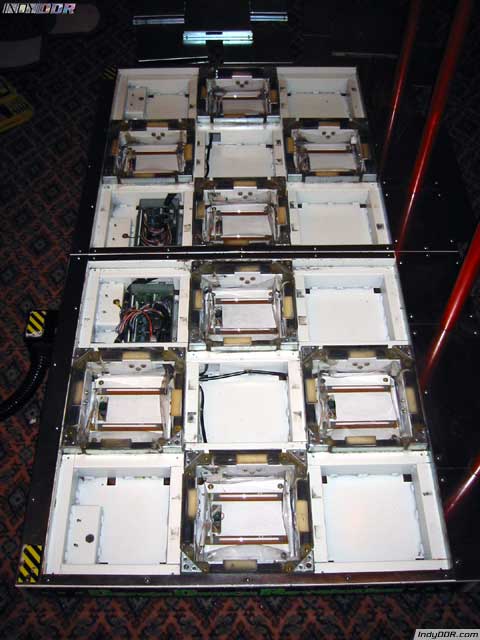
In general, an arcade DDR stage is pretty darn durable. Let's consider for a moment the types of conditions it must endure on a daily basis. All day long people step on it, jump on it, and pound on it - often two at a time. Temperatures can be quite warm - even hot - and moisture from humidity, sweat, and the occasional spilled drink can also be a factor. All the while, dust and dirt can work its way into the numerous cracks and crevices on its surface. It's only logical that it's going to need some care and maintenance. We've likely all played on a stage that was working less than optimally. Sticking arrows, missed steps, broken freezes - you get the picture. This article is designed to give you some tips on how to try to remedy those kinds of problems. Better yet, you can employ some of these techniques regularly to maintain a stage so that it won't experience those problems in the first place. First, a few disclaimers. I am not purporting to be an expert on this subject. I don't have any official or technical data. This is merely a compilation of my own experience and some research that I have done on the subject. Therefore, I will not be held responsible for any negative effects which may occur as a result of attempting anything in this guide. Now that that's out of the way, let's begin. First of all, you need some proper tools and plenty of time. Depending on how thorough you want to be, you can easily spend 3-6 hours on this project. In that time you may deal with as many as 240 screws of three different sizes. Take your time and use the proper tools - you'll be less likely to make a mistake or accidentally damage something. Here's what you'll need: #1, #2, and #3 Phillips-head screwdrivers flathead screwdriver vacuum cleaner rags or paper towels Windex (glass cleaner) Stainless steel polish I also recommend a power screwdriver or drill - especially one with an adjustable clutch. This can really save your wrists and can be extremely valuable for making sure screws don't get replaced too tightly. It is important to use the correct size screwdriver I mention on each of the screws involved. Using the wrong screwdriver can strip out the heads and otherwise damage the screws. All the screws are metric, so getting replacements here in America can be a real pain. The first step is to open up the arrow panels. Cleaning and maintenance of the arrows likely has the most direct effect on gameplay. Each arrow panel is secured by four corner brackets. Each of these brackets is mounted with two Phillips-head screws. These are 6mm x 10mm screws and you should use a #3 Phillips-head screwdriver on them. Remove each of the screws with a screwdriver. The power screwdriver or drill can really save you time on these as there are a total of 64 screws securing the eight arrow panels. To remove the brackets, I found that pressing down on the inside edge makes the outside corner stick up. Try to lift the bracket straight up as much as possible. If it gets at too much of an angle it can be difficult. 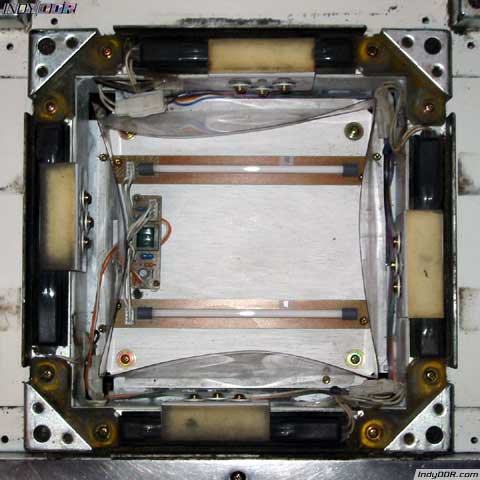
Once all the brackets are removed, you can remove the arrow panel itself. Sometimes you can just lift it out with your fingers, but you might need the flathead screwdriver to pry it up a little bit. Don't dig the screwdriver down too deeply as the sensors are right underneath the edges and you don't want to stab or pry them with the screwdriver. Now you should be able to look at the inner workings of the arrow. There should be four sensors, one on each edge. The center of each sensor should be covered by a metal bracket with a little foam padding on top of it. In addition, there should be some wiring and a plastic dust shield protecting the center of the compartment where the two lights are installed. You can remove the sensors by sliding them out on the side where the wire comes out. Be careful not to bend the sensor too much as you do not want to bend or break anything inside it. I've found that this can be done either with or without removing the bracket above it first. Vacuum out all the dirt that has no doubt accumulated inside this compartment. Make sure you check around for any parts (especially screws) that are loose or have fallen out before you do this as you don't want to vacuum those up too. You might need the flathead screwdriver to scrape the dirt out from the space between the sensor mount and the edge of the compartment. After you've removed all the loose dirt, you can wipe down the inside of the compartment with a rag and some Windex. I suggest you spray your rag with the Windex rather than applying it directly to the surfaces so that they don't get too wet. Be gentle when wiping down the light tubes so you don't break them. Also wipe down the underside of the arrow panel. You'll be surprised how much brighter the arrows will glow when you've wiped all the dust off the panel and the lights. 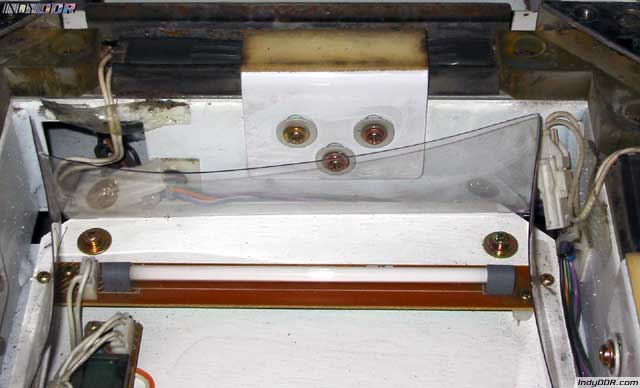
Now for some tips to make the arrow function as well as possible. First of all, check to make sure that all the screws holding the brackets over the sensors are present and tight. In my experience, loose or missing screws here are the leading cause of sticking arrows. Each screw should have a little metal spacer on the shaft and a washer between the head of the screw and the bracket itself. This design allows the metal bracket to float when the screws are installed. In other words, the bracket should be able to wiggle and move - this is normal. If it cannot move, you are likely missing the metal spacer on one or more of the screws. These are 4mm x 12mm screws and you should use a #1 Phillips-head screwdriver on them. I do not recommend using a power screwdriver or drill on these screws. It would probably be too big to get in this space anyway and the screws are pretty small and you wouldn't want to apply excessive force to them. Tighten the screws snugly, but don't over tighten and strip them. These screws will have a tendency to loosen with the vibration of gameplay, so it's not a bad idea to check them periodically. I've not tried this myself, but it has been suggested that applying Loctite threadlocker to the threading could keep them from coming loose by vibration while still allowing them to be removed with a screwdriver. I did some quick research and it looks like either Loctite Purple (low strength) or Loctite Blue (medium strength) would be appropriate for this application. If one or more the arrows has been having trouble holding freezes (e.g. you can see the light flash on and off while pressing it), I came across a tip in a similar guide that might help. I have not actually tried this myself, so I don't know how well it works, but it seems logical. Take some business cards and fold them in half lengthwise one or two times. Slide one underneath each of the sensors in the offending arrow. You may need to trim the business card down to get it to fit widthwise. I imagine that as the stage is used, the parts get worn and compressed to where the gap between the bracket above the sensor and the sensor itself gets larger. The business card would lift the sensor back up and close that gap. It makes sense, but again, I haven't tried it myself. 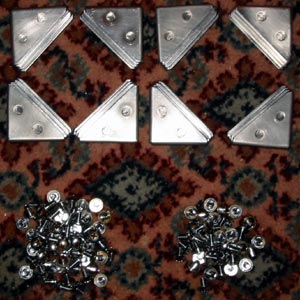
It's also a good idea to clean the screws and the corner brackets. I was able to clean the screws by filling up a cup with warm water and adding a little dish soap. Then I put the screws in the cup and agitated it for a minute or so. The screws came out nice and shiny and there was a lot of residual dirt left in the bottom of the cup that had no doubt been lodged in the screw heads. The brackets can be washed in the sink with warm soapy water as well. Just a little scrub with a sponge can take off any stuck-on residue. Be sure to dry all the screws and brackets before reinstalling them. Finally, check to make sure all the connections for the sensors are tight, although I doubt you'll have too much trouble with them. They're all locking connectors and aren't likely to come loose under normal usage. Reinstall anything you may have removed and you're ready to replace the panels and screw the brackets back in place. Once again, I recommend a power screwdriver or drill with an adjustable clutch. Set it so that you will not over tighten the screws. Now you can move on to the stainless steel plates, if you desire. For the most part, cleaning these plates and the compartments under them probably won't affect the performance of the stage that much. However, plenty of gunk can accumulate there nonetheless and a good cleaning certainly won't hurt and can make the stage look spiffy. Each of the plates is secured with four of the same 6mm x 10mm screws that are used to hold the corner brackets on the arrow panels (once again, use a #3 Phillips-head screwdriver). Once you remove these screws, you can lift the plate up. You may need the flathead screwdriver to pry it up a little, but be careful not to scratch or dent the panel. Underneath each plate is a structural plate that is mounted with four more screws. These screws are 5mm x 10mm screws and you should use a #2 Phillips-head screwdriver on them. Remove these screws and then lift the plate up. 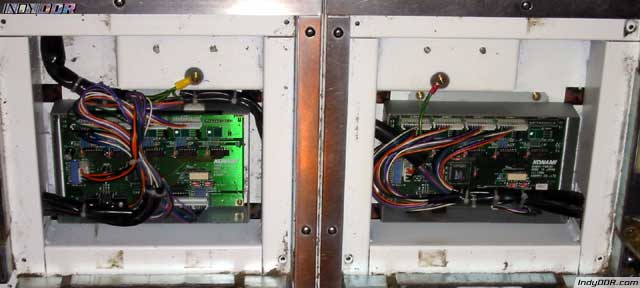
There's some wiring underneath the center panel on each side of the stage and there's a circuit board underneath the plate to the right of the up arrow on the Player 1 side of the stage and to the left of the up arrow on the Player 2 side of the stage. There's nothing else of much interest under the remaining plates. Once you've removed both the top plate and the structural plate, you can vacuum out any dirt inside the compartments. You may also wish to wipe them out with a rag and Windex. However, I wouldn't recommend spraying or wiping the circuit boards. I'd say just lightly vacuum them or blow any debris off of them with a can of compressed air. 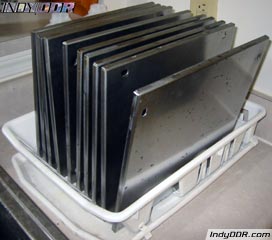
You can repeat the same cleaning procedure I mentioned earlier on the screws for these plates. You can wipe down the structural plate with a rag, but I wouldn't worry about it too much since it won't be visible when reinstalled. The top plates can be washed in the sink with dish soap and warm water. Scrub with a sponge to remove any stuck-on residue. Apply some stainless steel polish (following the directions for the product you choose) if you want to make them look extra nice. As before, make sure to thoroughly dry all the parts before reinstalling them. Finally, you can check the connections on the circuit boards to make sure they're tight, although I don't think you'll have very much trouble with these coming loose either. Be sure not to press too hard on the circuit board so you do not bend or break it. Now you're ready to reinstall the structural plates and the top plates. Once again, I recommend a power screwdriver or drill with an adjustable clutch so that you don't over tighten the screws. At this point, you're all finished! You stage should look great and may even play better as well (if it was having some trouble beforehand). Play a few games to make sure that everything is working correctly or optionally check each of the sensors in each panel with the I/O Test in service mode. Congratulations on a job well done! 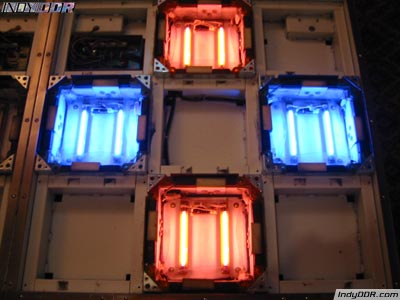 | ||||||||||||||||||||||||||||||||||||||||||||||||||||||||||||||||||||||||||||||||||||||||||||||||||||||||||||||||||